


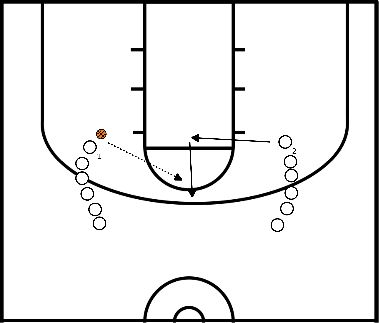
Basketballexercises for technique passing
- Throwing with a run-up from cone position V to position III, side A.
- Throwing with one arm from run-up position II and catching the ball with an extended arm.
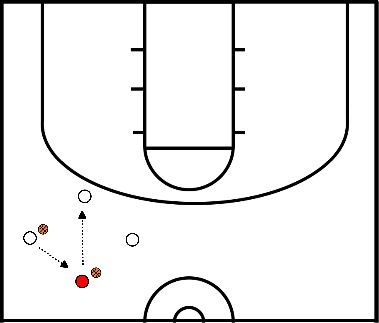
- With dribbles and intermediate dribbles overhead & intermediate dribbles.
- The tennis ball is replaced by a basketball. Player runs up and passes to a player at position 2.
- Player at position 5.
- Player chooses position 2 or 5 and passes to the place where they are not standing.
- 15 minutes of basketball throwing.
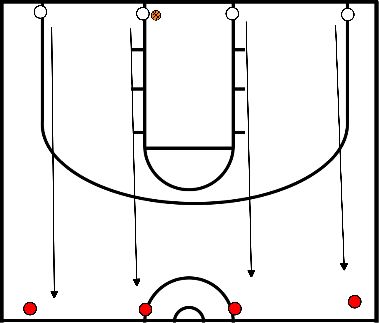
- Divide the team into three groups of four players each. One group stands on each baseline, and the third group is in the middle of the court. Players in the middle spread out along the midline.
- At the whistle, the players in the middle run to the baseline and ask for a ball. The player catches the ball, shoots at the nearest basket, and retrieves their own rebound.
- The player who passed the ball runs to the other side of the court for a pass from the other baseline. The rotation continues.
- Players must work hard for conditioning improvement.
- Set a target for passing and use correct footwork and shooting techniques.
- Ensure clean and accurate passes.
- Vary the type of shot (three-pointers, mid-range, lay-ups, etc.).
- Give players a time limit and a target for the number of scores to make.
- Adjust based on the team's level or the available time.
Objective
- Develop the correct passing and shooting techniques.
- Improve communication between teammates.
Execution
- Divide the team into four groups.
- Place one group at each block and one group at each elbow of the court.
- Give each group one ball.
- The first person in each line shoots, follows their shot, and passes the ball back to the next person in line.
- After the rebound, the shooter passes the ball back to the line they were in and rotates clockwise to the end of the next spot.
- All four lines work as a team and keep track of how many shots have been scored in total.
- Communication is crucial; players must make game-related passes and take shots.
- The time limit can be adjusted from five minutes to another desired duration or number of scored shots.
- The shooting positions on the court can be varied.
Objective
- Emphasis on various fundamental items such as passing, ball handling, transition, or shooting.
- Conditioning character for the core of the training.
- Complexity for brain training.
Execution
- Start with a multiple of 3 players. If not possible, one player steps out each time.
- Players #1, #2, and #3 start with a half weave to the midline.
- After the pass, #1 becomes a flyer, and after the pass from #3, he also becomes a flyer.
- #2 receives the ball last and dribbles to midcourt for a lay-up.
- #3 and #1 receive the ball from #4 and #6 for an outside shot.
- #5 grabs the rebound from #2 and restarts the exercise with #4 and #6.
- This repeats for a full court continuous drill.
Variations
- Ball handler must finish with at least one change of direction (e.g., spin dribble, reverse dribble, crossover).
- Limit the ball handler to a maximum number of dribbles for aggressive finishing.
- Flyers to stop with a jump stop or rhythm stop, or one dribble and pull-up.
- Flyers to make a jab step with a counter move.
- Start with a rebounding situation, vary with players in a line or at the board.
- Defend the ball handler with a close-out and box out after the score.
- Flyers make a "split the post" movement for timing.
Teaching Points
- Demand the pace from the players.
- Organization is complex; spend time organizing for younger ages.
- Make good stops when catching the ball.
- Ball handler must finish hard at the basket.
- Visualize the defender while dribbling.
- Use a speed dribble when the ball handler is the lead man.
- Good passing technique: pass ahead of the man, make eye contact, and pass firmly.
- Finishing: Go hard to the board and let the ball "kiss" the board.
- Shooting: Basics are footwork, making a good stop, and correct posture.
- Starting lineup:
- 1 group at the level of the left forward
- 1 group at the level of the right forward
- 1 ball
- Progression:
- Player 2 runs to the middle of the free throw line
- Player 2 runs to the top of the bucket
- Player 1 passes to player 2
- Player 1 runs to the middle of the free throw line
- Player 1 runs to the top of the bucket
- Player 1 receives the pass
- Passing to the other side
- Progression:
- 30 passes in 60 seconds
- 40 passes in 60 seconds
- Regression:
- No pass count
- Basic setup:
- In groups of 4
- Line up in diamond shape
- 2 balls
- The "victim" always has a ball
- Progression:
- 1 player is designated as the "victim"
- Players with ball always pass to the "victim"
- The "victim" passes back to any player
- After 30 seconds we choose a new "victim"
- Progression:
- Faster passing
- Regression:
- Slower passing
- With 1 ball
- Starting lineup
- 2 teams of 4
- 1 team stands on the end line with ball
- 1 team stands at the center line
- Course:
- Team 1 must cross the center line without dribbling
- Team 2 must cross the end line without dribbling
- Playing rules:
- The ball must not be held above the head
- You must make a pass within 5 seconds
- Screens are not allowed
- You get 1 point for crossing the end or center line
- The coach is the referee
- Progression:
- You must pass within 3 seconds
- Expanding the field to a full field
- Regression:
- Allow pass overhead
- No limit how fast you must pass
- Allow 1 dribble
- Making the field smaller
- Setup:
- 4 groups
- 2 baseline
- 2 centerline
- Balls to the midline
- Midline player dribbles past pylon and passes to corner
- Shot in the corner
- Left and right start alternately
- Dribbling past on the left is passing with the left hand
- Right hand dribble past is passing with right hand
- Players waiting at the center line may already dribble as if they are bringing up the ball
- Careful with passing
- Variations:
- Shot from 1 dribble
- Curl pass to the weak side corner
- Curl pass to the weak side corner and cut through
- 1 group baseline
- 1 group left wing
- 1 group right wing
- Ball baseline
- Ball left wing -first player has no ball.
- Player baseline passes to wing and does close out and dribbles past.
- Player wing dribbles past it with 2 dribbles towards middle and passes to other winger who rotates more.
- Player who rotates and receives ball does a three point shot.
- Player who cuts and passes comes back up and plays 1 v 0.
- Receives pass from player who will rotate later.
- Therefore, first player here has no ball.
- Own rebound
- Variant:
- Player who rotates and catches ball does a layup.
- Player who cut does a drive and then a step-back sweater.
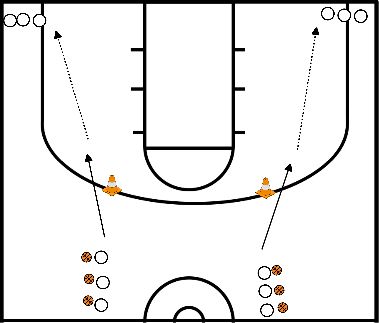
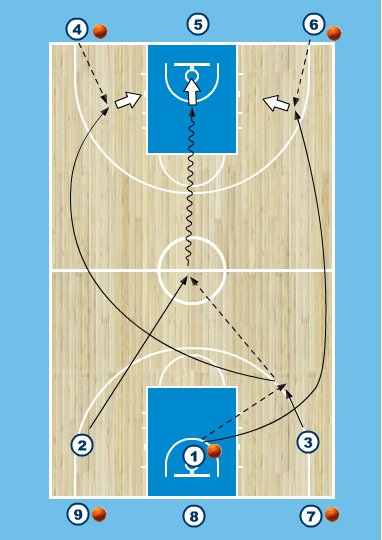
Exercise 1: throwing
- run-up from cone position V to position III side A.
- run-up position II and catch ball with outstretched arm.
Exercise 4: TB are replaced with ball , player runs on and keys to player at position 2.
Exercise 5: player at position 5.
Exercise 6: player chooses 2 or 5 - overplay to where he is not.
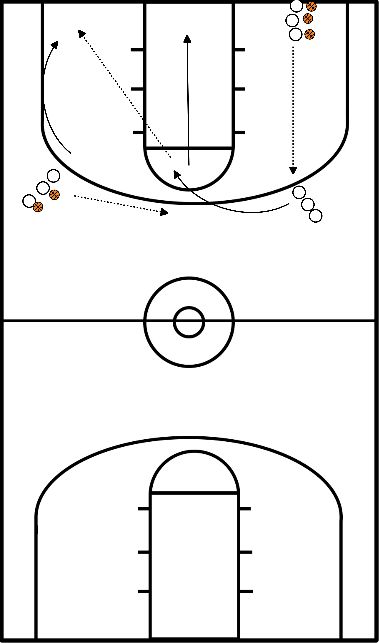
- The middle passes to a man
- Runs after the ball.
- Who passes to the man on the other side
- Also runs after the ball.
- They do this while running to the basket on the other side.
- When someone is close enough to the basket, the man runs a lay-up.
Wave for U12:
- Three teams, 1 ball: pass and cross behind the player.
- Do this slowly at first, U12 kids find this a difficult exercise. Focus on passing and running. Start together (half field lengthwise) and build up when it goes well.
- Depending on the size of the group, divide the field.
Variant for when it goes well:
- Finish with score and play 2x1 (the one who scores will defend),
- Pay attention to outlet pass (ask for the ball on the sideline).
- Shooting warm-up.
- Matching pairs starting from the back line to the halfway line.
- Minimum of 3 passes.
- When you reach the halfway line, the player on the sideline dribbles to the middle, between the legs, behind the back around the pylon and back to the right.
- Other player runs to a pylon outside the bucket, runs around it and offers himself for the pass.
- Then takes the shot.
- Passer rebounds and moves to opposite side of court for pairs, passes to opposite side and lay-up.
- Ball may not touch ground.
- Shooting warm-up.
- Matching pairs starting from the back line to the halfway line.
- Minimum of 3 passes.
- When you reach the halfway line, the player on the sideline dribbles to the middle, between the legs, behind the back around the pylon and back to the right.
- Other player runs to a pylon outside the bucket, runs around it and offers himself for the pass.
- Then takes the shot.
- Passer rebounds and passes to other side of court for pairs passing to the other side and lay-up.
- Ball may not touch ground.
- The feet are in a small scissor or parallel position.
- Knees slightly bent; torso slightly forward.
- bodyweight above both feet.
- the ball is held at chest level with the fingertips; thumbs behind the ball.
- the elbows point backwards and are not too close to the body. eyes directed at the goal.
- By extending the arms and the back leg, the ball is pushed away and guided for as long as possible; the ball leaves the hands via the fingertips.
- At the end of the action, the palms point outwards and the thumbs downwards;
- this is caused by the forceful folding of the wrists.
- The body weight is transferred to the front foot through the entire action.
- The pass is often supported by a step with the front leg in the direction of the goal.
- The chest pass can also be performed in a sideways direction; pivoting in the direction of the goal is necessary for this.
- feet in parallel position; ball in both hands in front of chest.
- eyes focused on the goal.
- Step with the left foot in the direction of the pass,
- so that the left side of the body comes in front (turning in);
- At the same time, the ball is brought behind the head with both hands;
- the body weight rests on the back leg.
- The elbow is under the ball;
- the angle between the upper and lower arm is about 90 degrees;
- the fingers of the throwing hand are spread.
- next: turn your hips and trunk to the left;
- the left hand will lose contact with the ball and is held horizontally to protect the action;
- the elbow is bent.
- The right arm swings in a straight line past the head in the direction of the goal; the movement ends with the wrist being folded over.
- The right arm swings in a straight line along the head towards the target; the movement ends with the flick of the wrist; the ball is pointed after by the throwing arm,
- while the wrist hangs down in a relaxed position.
- During the action, the body weight is transferred to the front foot.
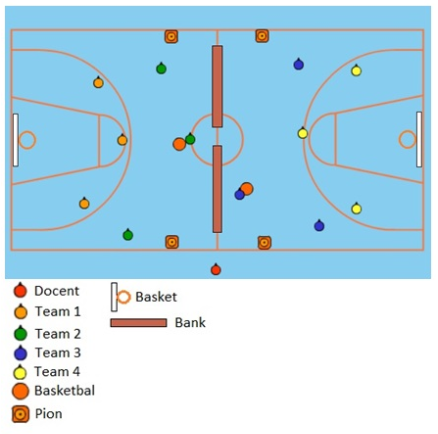
- The teacher divides the room into two squares by placing benches on the centerline of the room.
- Then the teacher makes 2 squares with pawns to catch up the right of attack.
- During this game the rulebook is used.
- See module basketball for this guide.
- The teacher divides the students into teams of 3, possibly with a substitute.
- See the tables at the bottom of the lesson preparation for the game schedules.
- The intention is that the team that has the ball (on the map team 2 & 3) try to score.
- To be able to score, the team must first get the right of attack.
- They get this right of attack when they arrive with the ball in the area of the pawns.
- From now on the team may score.
- They do this by shooting the ball into the basket.
- The other team must try to take the ball away from them.
- When this happens, the teams swap roles and the new team with the ball has to get the right of attack and try to score.
- There are rows of players on both sidelines.
- The front player of each row has a basketball.
- These players dribble to the sideline on the other side and play the ball with a bounce pass to the second player in the row who is now automatically in front.
- The first player closes in behind and the second player now dribbles across.
- The players practise the overhead pass (with 2 hands, from above the head) and vary the distance
- Players stand in a circle with 1 player in the middle.
- One player starts and throws the ball with a chest pass to the player in the middle.
- Then the first player runs after the ball to the middle.
- The player in the middle throws the ball to the next player in the circle and then runs after them etc.
- The players stand in a circle and pass the ball to each other.
- They are free to choose who they throw to and which pass variant they use.
- To make the exercise more difficult more basketballs can be used.
- The children stand in a large circle.
- There are several basketballs in the game.
- The children with the ball bounce the ball as fast as possible to a classmate or group member, while calling his or her name.
- This is recommended for children's camps (great outdoors!) or sports days, where children can learn each other's names and learn to catch the ball.
- Players who do not bounce the ball well, do not catch the ball or call out the wrong name, step out of the circle and do not participate for a while.
- As fewer and fewer players remain, the remaining players bounce more and more balls.
- Continue, until only one or two players remain.
- They have won.
- We are going to work on two baskets and therefore also in 2 groups.
- (How many groups you make depends on the number of baskets. More baskets means more groups).
- Half of a group stands approximately on the center line on the right side of the basket.
- The other half starts on the left side just beside the basket.
- These persons have the ball and throw the ball to the person on the center line.
- This person dribbles the ball to the basket, makes a lay-up, catches the ball and joins the line next to the basket.
This drill will help develop proper passing and shooting techniques. This drill also emphasizes communication between teammates
- Divide the team into four squads. One team on each block and one team on each elbow. Give each team one ball.
- The first person in each line shoots and follows his shot, passing it back to the next person in his line.
- After rebounding the ball, the shooter returns the ball to the line they were in and rotates clockwise to the end of the next spot. Rotations are shown in the diagram.
- All four lines work as a team and keep track of the total number of shots scored.
- Emphasize to the players that communication is very important in this drill.
- Players must make game-winning passes and their shots must also be taken at game level.
- The time limit of this exercise can be changed from five minutes to whatever you like or number of shots scored
- Also the spots on the court where the players shoot from can be varied

The players practice with the overhead pass (with 2 hands, from above the head) and vary with distance players stand in a circle with 1 player in the middle.
- One player starts and throws the ball with a chest pass to the player in the middle.
- Then the first player runs after the ball to the middle.
- The player in the middle throws the ball to the next player in the circle and then runs after them etc.
The players stand in a circle and pass the ball to each other.
- They are free to choose who they throw to and which pass variant they use.
- To make the exercise more difficult more basketballs can be used.
Goal:
- shot from the elbow
- outlet pass after score
- overhead pass from low post to elbow
Organization:
- after shot rebound and immediately step over the back line and take the ball
- always chase your ball and take the next position
- set a goal; e.g. 30 shots.
Teaching Points:
- in the last step bring the ball above your head and turn your face towards the pitch
- Tight overhead pass to the outlet
- ask high for the ball
- Pass the ball in the shot hand
Variations:
- counterclockwise and clockwise
- Fill up waiting time at the forward position with fake passes
- The other way round: after scoring, pass to the elbow and shoot from the corner
- Centers + Guards + Forwards
- from U12 - 2 or more players
- 1 ball per pair
- two baskets
- a pawn or pole
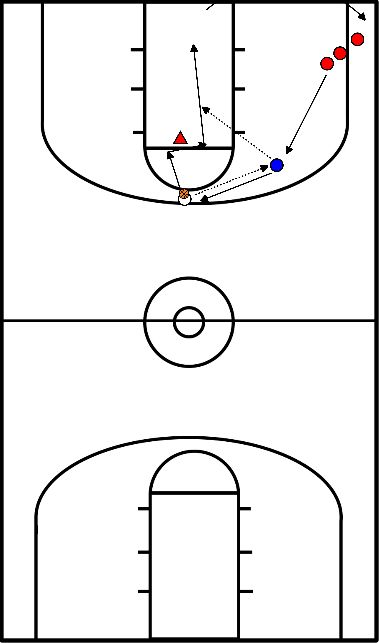
Prerequisites:
being able to run a layup from the pass at speed
Objective:
- train runner flyer
- Passing and catching at speed
Organization
- player 1 throws the ball against the board and catches the rebound
- catches the ball as high as possible
- 3 sprints to the outlet position and calls
- pass with an overhead pass to the outlet
- the man with the ball dribbles as fast as possible to the bucket of the other basket.
- defender sprints along the sideline
- receives the pass at full speed
- and makes the lay up without dribbling
Teaching Points:
- sprinting Â- communication
- correct dribble start
- pushing the ball at speed dribble
- The dribbler must see where the flyer is.
- pass in time
- Shooter catches his own ball
- passer sprints around the pawn
- calls
- receives the ball at the outlet position with an overhead pass
- both players run the same 2 teg
There are rows of players on both sidelines.
- The front player of each row has a basketball.
- These players dribble to the sideline on the other side and play the ball with a bounce pass to the second player in the row who is now automatically in front.
- The first player closes in behind and the second player now dribbles across.
The players practice with the overhead pass (with 2 hands, from above the head) and vary the distance players stand in a circle with 1 player in the middle.
- One player starts and throws the ball with a chest pass to the player in the middle.
- Then the first player runs after the ball to the middle.
- The player in the middle throws the ball to the next player in the circle and then runs after them etc.
The players stand in a circle and pass the ball to each other.
- They are free to choose who they throw to and which pass variant they use.
- To make the exercise more difficult more basketballs can be used.
Emphasis can be placed on different fundamental items. Passing, ball handling, transition or shooting. You can
give it a conditional character for the core of your training.
The exercise is also fairly complex, which means that the players also have to think a little during the exercise (brain training).
- The exercise starts with a plurality of 3 players.
- Even if you don't have a plural of 3, the exercise is possible, only then one player steps out each time. #1/#2/#3 start the exercise with a half weave to the center line.
- After his pass #1 becomes a flyer and after the pass from #3 he also becomes a flyer. #2 receives the ball last and dribbles midcourt for a score (lay-up).
- #3 and #1 receive the ball from #4 and #6 for the shot from outside. #5 rebounds the ball from #2, and starts the same drill along with #4 and #6.
- In this way this exercise repeats itself and a full court continuous drill is created.
Variations:
- The ballhandler (#2 in the first diagram) must finish with at least 1 change of direction (spindribble, reverse dribble, crossover, etc)
- Give the ballhandler a maximum number of dribbles so that he finishes aggressively.
- Have the 2 flyers who receive the ball stop with a jump stop / rhythm stop / or take 1 dribble and pull-up.
- Have the 2 flyers make a jab step with a countermove
- Starting with a rebound situation, you can vary with #1 / #2 / #3 in a row and throwing the ball up against the board (tipping), or have two players start at the board where one defends the outlet pass.
- The disadvantage of this is, that you have to constantly reorganize, and the continuous nature of the exercise disappears.
- Have #2 (in the first diagram) defend the ballhandler with a close-out and box out after the score or goal attempt.
- The 2 flyers make a "split the post" move, so they make a front move and cut in on the other side.
- This is a very good variation in terms of timing, as it involves three players.
Teaching points:
- Require the tempo you want from the players. Depending on the age, the exercise should reflect what you want to train. Keep in mind that the organization is quite complex, so for younger ages you will spend a lot of time on "organizing" the drill. So, wasted time, and ask yourself if you have this time.
- Make good stops, when catching the ball (flyers). Be critical on running, see that players make a stable stop, bring butt back, and jump straight up. The shot starts with the “foundation†and that is the footwork. If that is not right, it will affect all of your shot.
- Ballhandler finished hard on the basket. Re-enact the game situation! The attacker must visualize the defender. So dribble with the right hand (your body between the ball and the defender), protect the ball, also in 2T rhythm.
- Also use a situation where the ballhandler is the "front man" of the pitch, and therefore has to finish with a speed dribble: high, forward dribble, push the ball in front of you, and as few dribbles as possible (every dribble is a risk).
- Passing: Think about a good passing technique and its teaching points: Pass in front of the man, ask, make eye contact, target as a receiver, run into the ball, pass tightly, arms out, thumbs down after the pass. Also remember that players do not necessarily have to complete their 2T rhythm.
- Finish: Going hard to the board, and letting the ball “kiss†the board. The ball makes a so-called soft touch against the board. Especially with young players this is obvious, as they tend to “throw†the ball against the board when going hard. This implies that they have to rise (long stride, small stride, take a knee, stretch, the ball actually leaves your hand automatically due to the vertical movement of your body, do not bump).
- Shooting: Basics are footwork! Make a good stop, and the feet should be in the right position. Shoulder width, foot under the shot-hand slightly in front of the other, slightly through the knees (120 degrees), straight back, upper arm immediately horizontal after the catch, and forearm slightly less than 90 degrees. The forearm moves in a vertical direction first, and do not bring the ball behind your head (a common mistake among children). Look under the ball and then do the follow-through. Wrist flap and follow through!
- First train and program the technique, then focus on the speed. Note: this will not work in 1 training! Depending on the age, you can play with this, read: put the emphasis on something.
- Set up players:
- 1 with ball on the head (pos 1/white),
- 1 in position 2 or 3 (blue),
- The rest on 4 or 5 (same side as the forward, red).
- A defender or pilon somewhere around the free throw line or closer to 1 (is the defender of 1)
- White passes to blue and immediately makes a cutting movement.
- Feint to the left and cut across the defender
- Blue passes the ball to white in its movement and takes position 1.
- First of red fills in the position of blue.
- White scores with the ball and the ball goes back to the new player in position 1.
- White follows red and becomes the last player in the red row.
- The exercise starts again.
- Player is explained shooting technique.
- Practicing over distance on the field.
- Pay attention to technique and the curve of the ball. After 10 practice throws in the field, the first player slides into the ring.
- 1 Player stands in the first hoop and shoots. If it's in, it's 1 point, player moves to the second hoop and shoots , 2 points if it's scored.
- If it's not scored, then move to 1 hoop closer. If it's scored, move to the 3rd hoop.
- If you score the 3rd hoop, you get 3 points and you may stay and shoot again.
- Max score is: 1-2-3-3-3-3-3-3=27 points.
- Under the basket is a teammate who rebounds and passes the ball back to the shooter.
- After 10 attempts, shooter and rebounder change positions. 10 attempts again
- Remember your score.
- After one session (10 throws each) these players go to the field to practice and move up the line.
- When everyone has finished, compare scores.
- Points of attention: shooting technique, rebound action, (shooter ask for the ball) and passing technique.