


Soccerexercises for u20
- Play two against one. If there are two players left, they play one against one on a narrower field.
- The duo tries to score on the two small goals.
- After approximately 8 minutes, switch players.
- If the duo finds it too easy, move the two goals closer together.
- Due to the many one against one duels, you can quickly see if they are performing well or less well.
- Do not give instructions in the first match.
- Give players the chance to improve themselves.
- Prevent the opponent from being able to shoot on goal.
- Ensure you position yourself so that it is difficult for the opponent to pass to their teammate.
- 2 large goals
- Play in a formation of 4 against 4, 3 against 3, or 2 against 2.
- Players may touch the ball a maximum of 2 times.
- The ball may be controlled, but must then be played on in one touch.
- After a goal or when the ball is shot over the line, possession goes to the other team.
- Scoring from your own half is not allowed.
- A player must always be passed before the ball can be played on.
- If this is not adhered to, the opposing team receives a free ball.
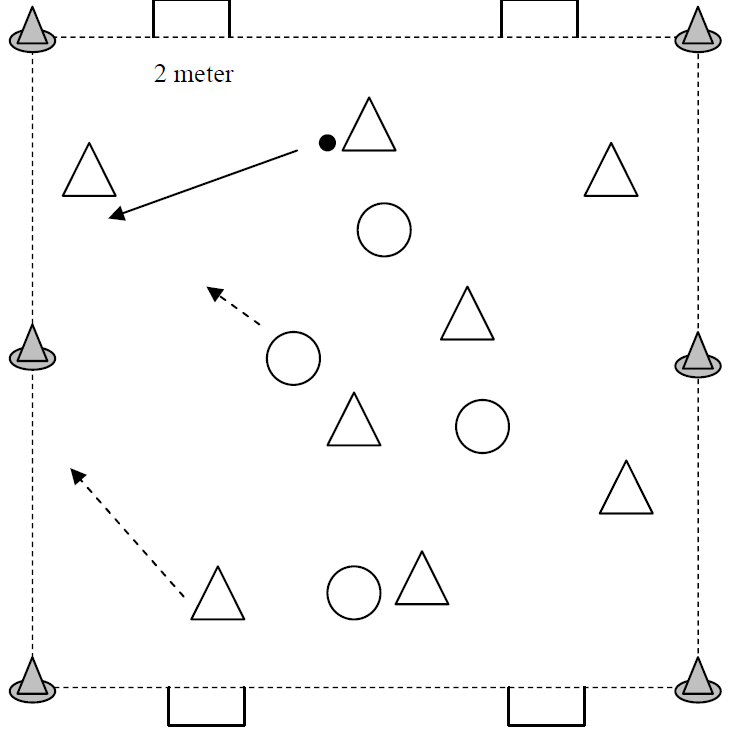
- Play 6 versus 5 plus goalkeeper.
- When the team that must score on the large goal loses the ball, they must defend five small goals.
- Switch sides after 15 minutes.
- If the attackers of the triangle team lose the ball, this can quickly result in a counter-goal.
- Players who do not defend enough in competitive matches may find this game format less enjoyable.
- Ensure you mark your man on time.
- Do not rush in.
- Mark on the correct side.
- Pay attention to your posture during duels, bend your knees.
- Goalkeeper with defenders at the goal (near post and far post).
- Other defenders may take a free role.
- Attackers position themselves mainly at the far post.
- The player taking the corner kick passes with a strong ground pass to a teammate nearby.
- The teammate shoots the ball directly at the goal.
- Defenders attempt to block the ball.
- If the ball goes out, a new corner kick is taken.
- If the goalkeeper catches the ball, a new corner kick must be taken.
- Defenders must block the ball.
- If the goalkeeper catches the ball, attackers must immediately retreat to the midfield.
- Mark out a field with four cones, 10 by 10 metres.
- Divide the players into two groups. One group moves horizontally from left to right. The other group moves vertically from bottom to top.
- At the whistle signal, players return to their starting position.
- Players must not touch each other or the ball of another player. In case of contact, both the player and the one who is touched receive a penalty point.
- Crossing is only allowed at the whistle signal from the trainer.
- Start with dribbling.
- Then shoot through small gates.
- Via a one-two pass, a cross is delivered which is then shot on goal.
- Depending on the number of players, you can start with 2 balls at positions A and C, or with 3 balls simultaneously.
- Everyone shifts one position each time.
- If necessary, control the ball first.
- Dribble with both feet.
- Do not pass too hard or too softly.
- Form groups of 2 players, with 1 ball per group.
- The players with the ball stand on the sideline.
- The other players stand opposite them, approximately 6 metres away.
- Player A dribbles forward.
- Player B jogs backward across the field.
- Player A passes the ball to Player B, who passes the ball back to Player A.
- Repeat this until they reach the other sideline.
- Switch roles when the players reach the other side of the field.
- Player A then jogs backward to the starting line.
- Alternate between right foot and left foot.
- Try to apply one-touch passing.
- Focus on quality over speed; it is not a race.
- Mark the field with 4 cones in a 20 by 20 meter area.
- Each pair of players receives a ball.
- The purple player must try to shield the ball from the blue player.
- The blue player must try to recover the ball without committing a foul.
- If a player recovers the ball, that player may shield the ball and the other player must try to take it back.
- On the coach's whistle, you must switch player groups.
- You may not switch to another player you have already played against.
- Use your body effectively when shielding the ball.
- The game is played between two teams against each other.
- The attackers play towards a large goal.
- The defenders play towards four small goals on the sides.
- If the team that must score on the large goal loses the ball, they must defend the four small goals.
- After 15 minutes, switch halves.
- If the attackers lose the ball, it can quickly result in a counter-goal.
- Players who do not defend enough in competitive matches may find this game form challenging.
- Mark the opponent on time.
- Do not lunge.
- Defend on the correct side.
- Posture during duels, bend the knees.
- 4 to 6 cones to dribble along.
- 2 cones in the goal.
- Player dribbles along or through the cones.
- Player attempts to knock over one of the cones with a powerful shot (using the top of the foot) in one motion.
- The player must retrieve their ball from the net themselves.
- The player must set the cone upright themselves.
- The player must collect the ball they missed themselves.
- Another player may only start once the first player has cleared their ball.
- Touch the ball with your right foot every step of the way and slalom around pots that are close together
- Zigzag exercise, slalom around pots with a sharp cutting movement
- Around 2 pots and on return stop the ball with a sharp cutting movement.
- Float in a "lane" of pots with the right kicking movement and then take a few steps and hit the ball again, etc.
- Same as 4) but then every step touching the ball in high tempo
Organisation:
The game is played 3:3 with extra players on the sides, the outfield players. These 2 players are with the ball-carrying team.
Encourage the offside players to play quickly.
The offside players can also dribble with the ball first
After a few minutes, they must either play directly or pass and play
If this is going well, you can also let the two offside players play directly.
The players on the outside are not allowed to score
After 10 minutes or a little less, change the outfielders.
Remarks:
After the offside players have to accept and play, the game runs better. There is
more football in the gamenow
, while in the beginning the outfielders were running a lot with the ball
.
Points of attention:
Try to play directly.
Make sure they use the sides and do not always go for their own success.
Organization:
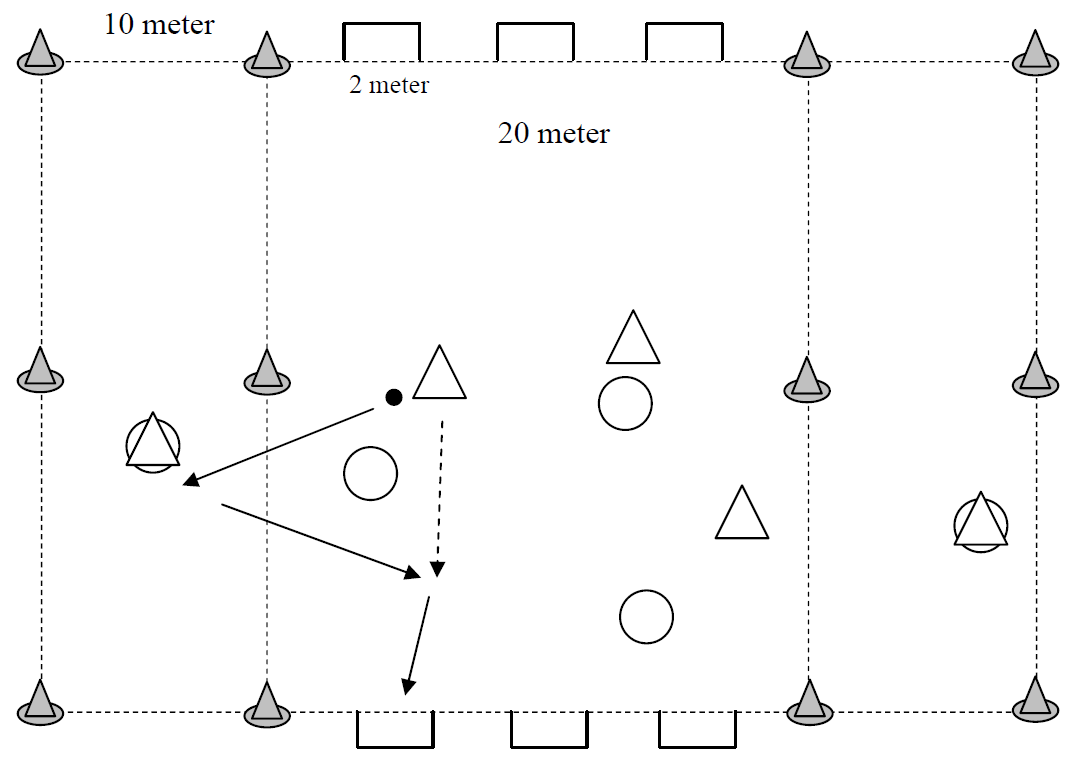
The game is played 2 against 1. If there are 2 players left they play 1:1 on a smaller field.
The pair tries to score on the 2 little goals.
After about 8 minutes the players are changed.
If the 2 team has it too easy, you can move the 2 goals closer together.
Remarks:
Because of the many 1:1 duels you can soon see if they are doing well or not so well. Don't
give them instructionsin the first
game. Give them the chance to improve themselves.
Points of attention:
Prevent the opponent from shooting at goal.
Position yourself in such a way that it is difficult for your opponent to pass to his/her team-mate
Organisation:
On 2 fields 3:3, 4:4 or 4:3 is played.
You can score with a dribble through one of the two little goals.
First try to encourage them to make passing moves.
If that is going well, you can also try to make sure they make the right choice between passing and playing over.
After about 10 minutes a different opponent.
Remarks:
When changing opponents, you can indicate which nice passing actions you have seen.
Points of attention:
Do not use the passing move too far or too close to the opponent.
The body must move with the passing move in order for it to be successful.
Organisation:
On 2 or 3 fields play 4:4, 3:3 or 2:2.
Encourage shooting from distance.
Points of attention:
Technical execution of the kick with the inside of the foot
: Stand leg; point in the direction of play; bent at the hip, knee and ankle.
Playing leg; turned outward; knee and ankle bent.
Playing foot; perpendicular to the direction of play; sole of the foot parallel to the ground; toes raised;
no weak ankleon the
kick.
A controlled swinging movement.
Technical execution of the kick with the inside of the instep
:Stand leg; 2 to 3 foot widths next to the ball; bent at the knee.
Tackle; on the inside of the spot where the laces begin.
Approach from an angle of approximately 45º.
Organisation:
The game will be played 8:4.
6:3, 7:3, 7:4, 9:4 or 9:5 is also possible.
With more or less players the size has to be adjusted.
The 8-team may score after 5 replays.
The 4-player team may always try to score.
When the ball is intercepted by the foursome, when it goes out or after a goal has been scored, a new count must be made.
count again.
After, in total, 5 goals or after 10 minutes substitute.
To make it easier or more difficult, the number of replays can be changed.
Points of attention:
Use the left and right foot.
If possible, keep the ball low
.
Correct ball speed.
Play directly.
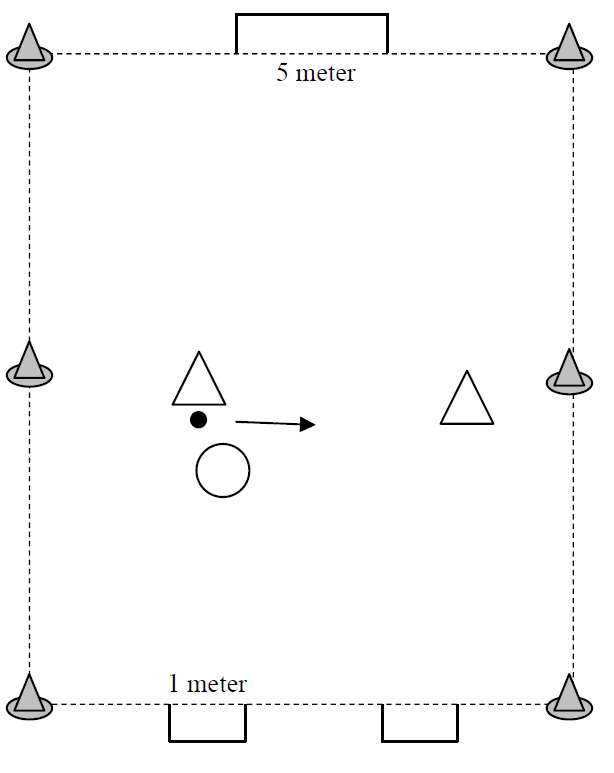
Field setup:
2 large goals
How the game progresses:
This can be done in 4 v 4 or 3 v 3 or even 2 v 2 formation. Players must always pass 1 player before the ball is passed to the teammate.
Rules/tips:
- If there is scored or shot over the line the ball must be given to the other team.
- A goal may not be scored from the team's own half.
- One player must always be passed before a pass can be made. If this is not done, it is a free ball for the other team.
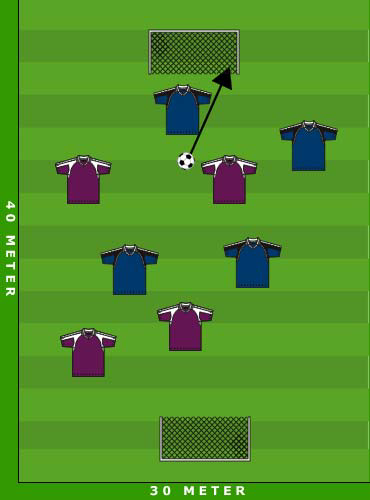
Field position:
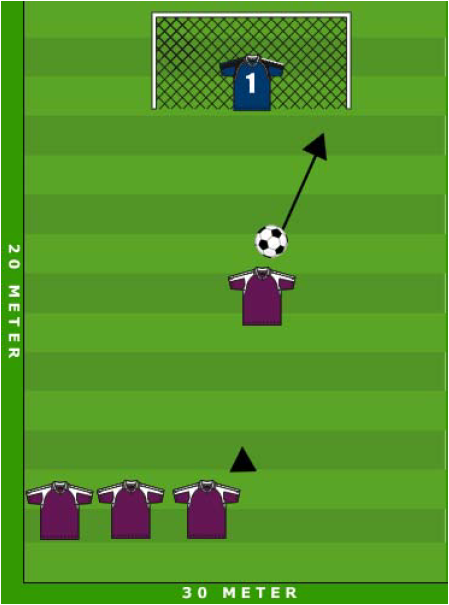
1 starting pawn at 30 meters from the goal. A defender at 10 meters from the goal. A goalkeeper on the goal. A second defender with the rising attacker.
Sequence of play:
According to the numbering in the diagram, the pass from the attacker through the midfielder is played deep. The defender runs with the attacker while the midfielder runs towards the goalkeeper to get the ball there and tries to score.
Rules/tips:
- Defenders start at 50% effort and increase it later.
- Make sure the ball is played deep.
- The cross can be hit from the left or from the right.
- A variation on this is to play with 2 midfielders and have 1 run towards the far post.
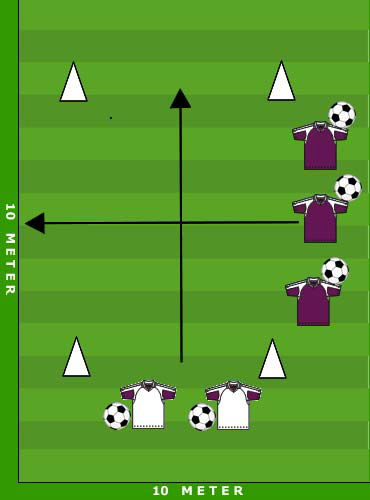
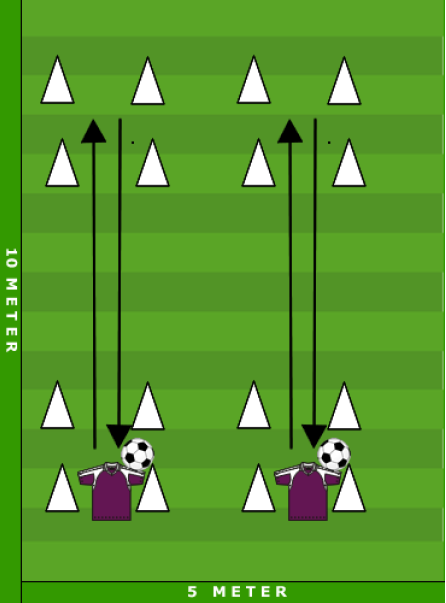
Field setup:
Field set up with 4 pawns at 10 by 10 meters.
How to play:
There are 2 groups made. One group runs horizontally from left to right and the other group from bottom to top. When the other side is reached, the whistle must be blown and the group goes back.
Rules of play:
- You may not hit another player or the player's ball.
- If you hit someone, you and the player you hit get 1 penalty.
- You may not run over until the coach whistles.
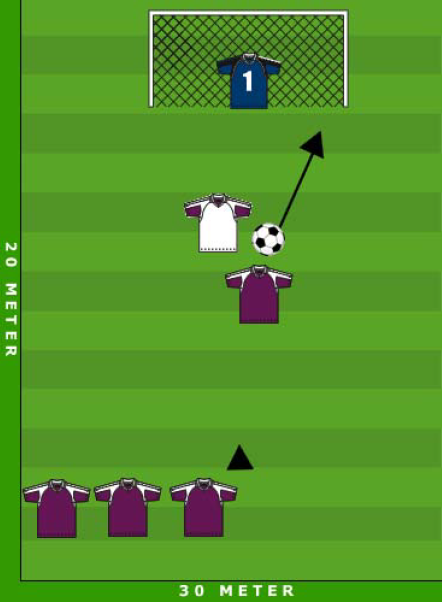
Field position:
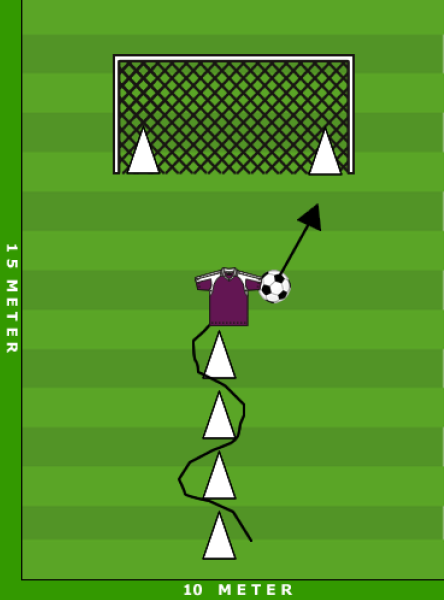
1 starting pawn at 30 meters from the goal. A defender at 20 meters from the goal. One goalkeeper on the goal.
How to play:
Player dribbles towards the goal and tries to pass the defender and then score a goal at the goalie.
Rules/tips:
- Only when the first player is finished can the second one, etc.
- Start with 50% defence and increase it later on.
- Try different passing moves.
- Always try to get the ball in front of your shooting foot after the pass.
- For the goalkeeper: only when the attacker has passed the defender should he run out
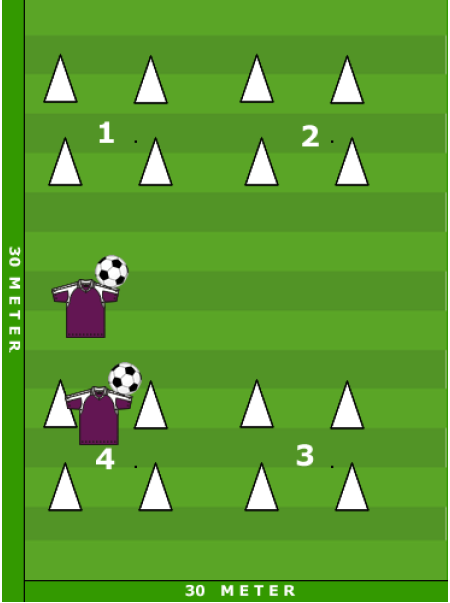
Field setup:
4 x 4 pawns in a rectangle arrangement.
Sequence of play:
At the 1 x whistle, all players run with the ball to square 1, at 2 x whistle to square 2, etc.
Rules of the game:
- The player who gets the ball to the square first gets 1 point.
- The last player to reach the square must sprint around the whole playing field.
Field position:
4 to 6 pawns along which to dribble. 2 x a pawn in the goal.
How to play:
Player dribbles along/through the cones and tries to knock over one of the cones in one move with a hard shot (so top foot).
Rules/tips:
- The player must retrieve his ball from the net himself.
- The player must retrieve his ball from the net.
- The player must retrieve the ball himself.
- Another player can only start when the first player has taken his ball away.
Field setup:
4 x 4 pawns in a rectangle arrangement.
How to play:
Each player sprints from the square of cones to the square of cones on the other side. Once there, they head the ball in the opposite direction (either with the inside or outside foot).
Now they sprint to the other side again to send the ball in the other direction in that square as well with a cutting movement.
Rules of play:
- The ball is not allowed to go outside the square of pawns.
- You have to sprint back and forth twice before the next player can play.
Field position:
1 pawn to be started from.
How the game progresses:
Player sprints with the ball towards the goalkeeper and tries to score.
Rules/tips:
- The player must retrieve his ball from the net himself.
- The player must retrieve the ball he missed by himself.
- Another player can only start when the first player has taken his ball away.
Field position:
Line up 2 x 4 x 2 pawns side by side to create two streets of pawns.
How to play:
Players must try to pass exactly through the street of pawns and then sprint through it chasing the ball. Another player (white) receives the ball and dribbles to the other street. There this player does exactly the same towards player 3.
Player 3 starts again on the same spot as player 1.
Rules of play:
- The ball must go through the street of pawns.
- If you hit a pawn, you must sprint to set it straight and try again.
- The ball must pass all cones before the receiving player can receive it.
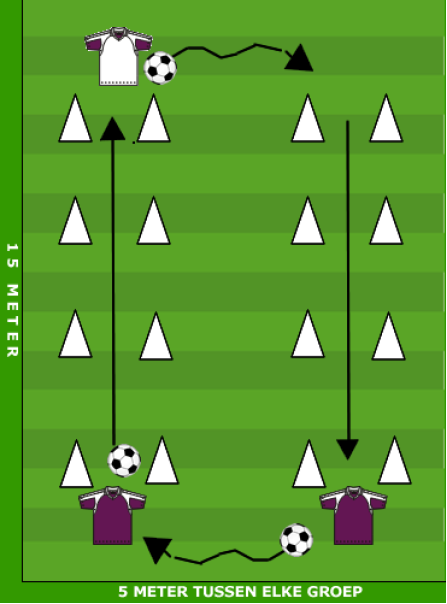
Field setup:
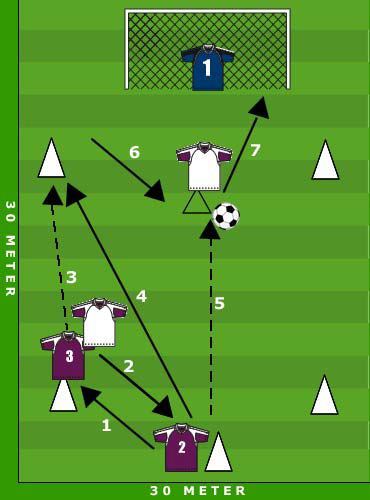
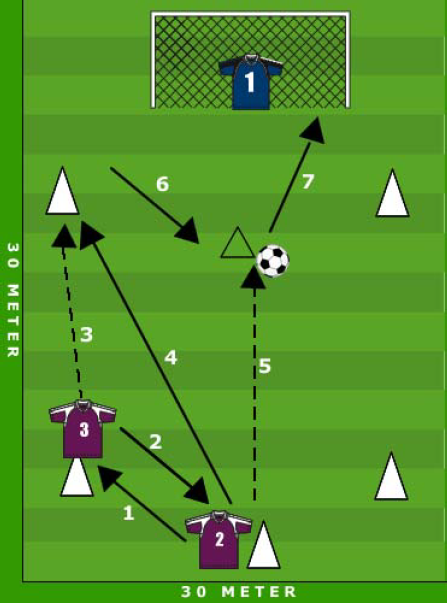
5 pawns including 2 x 2 on each side and 1 in the middle as the starting position.
How to play:
Player number 2 passes the ball to player number 3 who passes the ball back to player number 2. Player number 3 runs on to the pawn in front left and waits to receive the ball from player 2. Player 2 himself runs on to the cone in front of the goal. Player number 3 passes the ball and player 2 tries to score on the goalkeeper.
Rules/tips:
- The numbers in the image to the right indicate the order.
- Try to pass the ball from the left as well as from the right side. Swap when everyone has been there once.
- To make it easy at first you can also start without a goalie.
Field setup:
Line up 2 Pawns per player group opposite each other with starting 5 meters in between. Later this can be extended to 10 or 15 metres.
How the game progresses:
The players must try to knock over each other's cone.
Rules of the game:
- You are not allowed to stand in front of your cone but must always stand behind it.
- When you shoot, you can put the ball on the left or the right side of the cone.
- If you hit the cone you get 1 point.
- When the trainer whistles you have to change with another player.
- You may not stand opposite the same player.