Hockeyexercises for u11
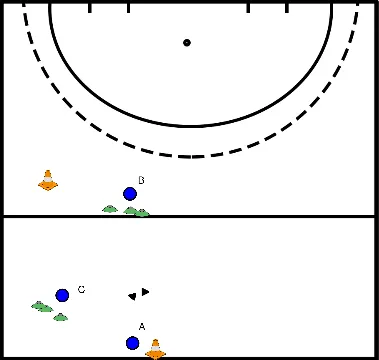
Execution
- A starts with the ball and passes to B.
- B moves in front of the cone and receives the ball from A.
- B passes the ball back to A.
- C runs to the corner and receives the ball from A.
- C receives the ball openly.
- B continues to the line and receives the ball from C.
- A continues to the top of the circle.
- B passes the ball to A.
- A finishes on goal.
Objective
- Improve defensive and offensive techniques in an indoor hockey situation.
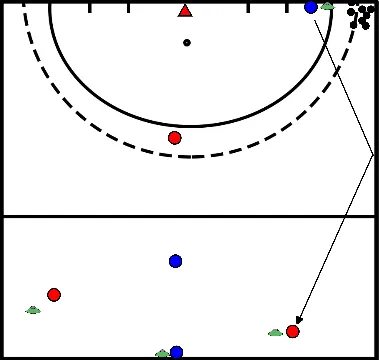
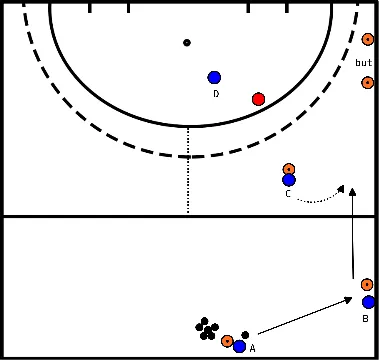
- Blue defends, red attacks.
- Blue plays the ball via the boards to a red team member on the centre line.
- After the reception by red, a 3 versus 2 situation starts with blue defending and red attacking.
- After the first pass from red, the defender on the centre line may join the play, turning it into a 3 versus 3 situation.
- Change the exercise to a 4 versus 3 situation for extra challenge.
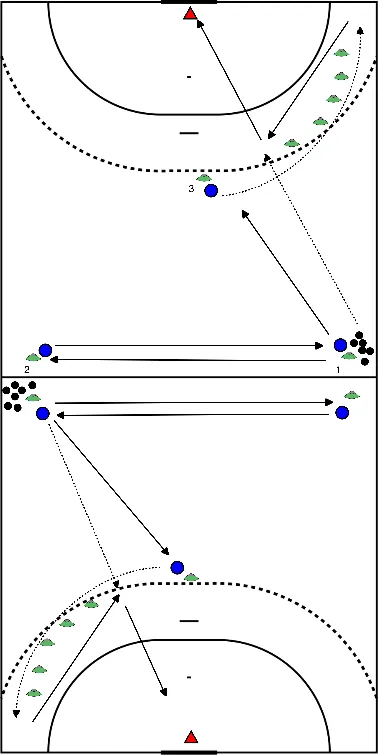
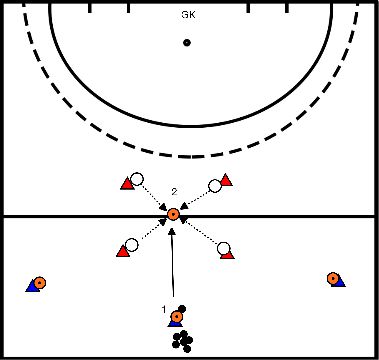
Execution
- Player 1 passes the ball to Player 2.
- Player 2 receives the ball and plays it back to Player 1.
- Player 1 receives the ball and passes to Player 3.
- Player 3 runs with the ball on the forehand towards the right back corner.
- Player 3 turns closed to the inside and passes back to the top of the circle.
- Player 1 has moved towards the top of the circle after passing to Player 3 without creating a shadow.
- Player 1 receives the ball and finishes high on goal.
- Player 1 moves to the position of Player 3.
- Player 3 moves to the position of Player 2.
- Player 2 moves to the position of Player 1.
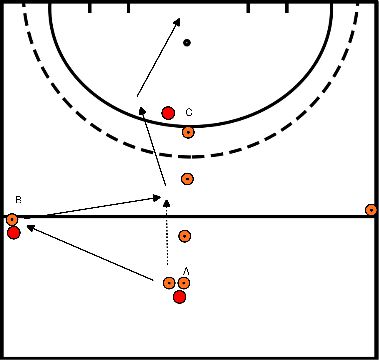
Description
- A passes the ball to B.
- C moves towards the space on the sideline and accelerates in that direction.
- C receives a strong pass from B.
- C and D play a two against one against the red defender.
- Improve coordination and teamwork in situations of numerical superiority.
- If the defender recovers the ball, attempt to score in the small goal on the side.
Execution
- Each exercise is performed twice, so two rounds.
Exercises
- Dribbling
- Touch the ground
- Heels to buttocks
- Knees up
- Sideways step
- Crossover step
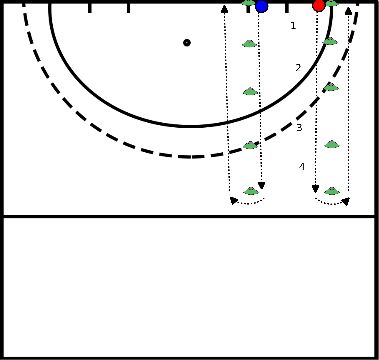
Execution
- Player A starts with the ball and passes to Player B.
- Player B receives the ball and passes directly back to Player A.
- Player C moves wide and receives a firm pass from Player A.
- Player B moves towards the circle and gets the ball back from Player C, who cannot play forward due to a defender.
- Player B receives the ball, accelerates towards the circle, and strikes at goal.
Execution
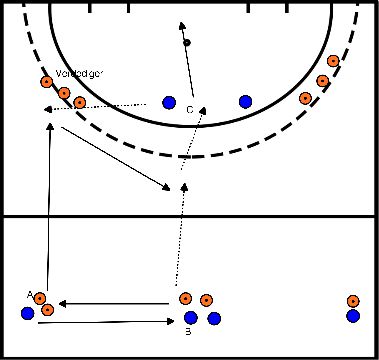
- Player A starts with the ball and passes to Player B.
- Player B receives the ball and passes to Player C.
- Player C receives the ball and plays it wide to the advancing Player A.
- Player A receives the ball, creating a 3 versus 2 situation against the defenders.
- Defenders start in the circle and may step out as soon as Player C has received the ball.
- Attackers attempt to score on the large goal.
- Defenders score in the small goal at the sideline.

Execution
- We play a 3 versus 3 match with an emphasis on communication between attackers and defenders.
- How do you position yourself and how do you get open for your teammates?
- Players A, B, and C form a team. The first pass goes to player B, from where the 3 versus 3 begins.
- The defenders apply pressure on the ball and try to prevent the attackers from playing through the centre of the field.
- They ensure that the axis of the field is well defended.
- If they win the ball, they score in the small goal on the side of the field.
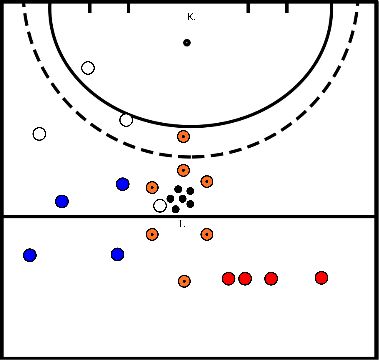
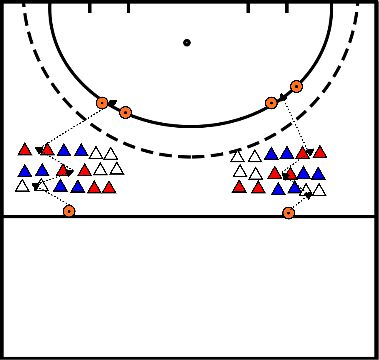
Execution
- The balls start with player 1.
- Player 1 passes to player 2.
- Player 2 receives the ball; at that moment, the four players around player 2 may apply pressure.
- Player 2 must find a way and attempt to pass to a teammate in orange.
- If player 2 can make the pass, the orange team attacks in a 4 versus 4 situation.
- If the white team intercepts the ball, they attack in a 4 versus 4 situation.
Execution
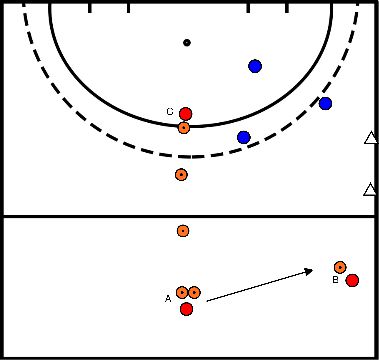
- A starts with the ball and delivers a hard, targeted push or flat pass to B.
- B receives the ball and plays it back to the advancing A.
- A delivers a hard, targeted push pass to C.
- The ball can be played directly to C's stick or as a deflection, allowing C to score with a tip-in.
- Set up the exercise on both sides of the field.
Execution
- The trainer calls out a colour code, for example: WHITE RED RED.
- The player who reaches the circle first is allowed to strike first.
- Keep an eye on the ball and pay attention to your running direction.
- Look at your teammate to determine if you can shoot at the goal.
Setup
- 3 teams: blue, red, and white.
- Each team has 3, 4, or 5 players.
- The attacking team (A) has 1 extra player (e.g., 3:2, 4:3).
- One player from the defending team (B) is positioned with the trainer.
- The non-playing team (C) is positioned at the centre line.
- If team A scores, they defend with one player less.
- Team B positions itself at the centre line and goes on the attack.
- The trainer introduces the ball into play.
- Alternate left and right sides.
- Attack from the left: Blue attacks, white defends, red is ready on the right.
- Attack from the right: Blue defends with one player less, red attacks, white is ready on the left.
- Attack from the left: White attacks, red defends with one player less, blue is ready.