

Hockeyexercises for u15
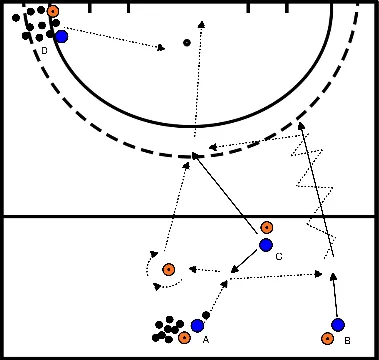
Execution
- Player A passes the ball with a slap or hard push to Player C.
- Player C runs in and deflects the ball wide in one motion to Player B, who is also running in.
- Player B receives the ball on the run and accelerates with the ball on the stick to the edge of the 'dotted circle'.
- At the edge of the circle, Player B delivers the ball with a hard push to Player C, who has run around the cone and is offering themselves.
- Player C receives the ball just outside the circle, takes it into the circle with one touch, and strikes at the goal.
- Then Player C receives a firm ball played to the second post by Player D and deflects it towards the goal.
- Rotate in order: A to B, B to C, C to D, D to A.
Execution
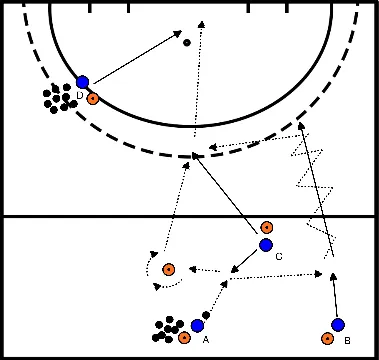
- Player A passes the ball with a slap shot or hard push to Player C.
- Player C runs in and bounces the ball in one motion wide to Player B, who is also running in.
- Player B receives the ball on the move and accelerates with the ball on the stick towards the edge of the 'dotted circle'.
- At the edge of the circle, Player B passes the ball with a hard push to Player C, who has run around a cone and is offering support.
- Player C receives the ball just outside the circle and takes it into the circle with one touch to then hit towards the goal.
- After the hit on goal, Player C receives a 'rebound' ball played by the trainer from the baseline and finishes it on the goal.
- The players rotate in the order: C to A, A to B, and B to C.
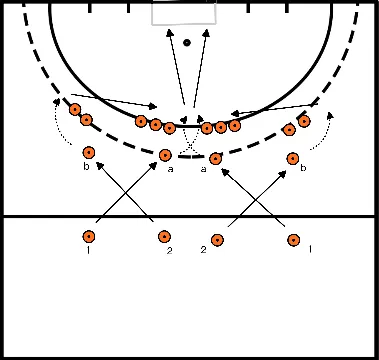
Execution
- Player 1 passes the ball to Player A.
- Player A receives the ball and dribbles around the cones.
- Player A takes a shot on goal, using both backhand and forehand techniques.
- After the shot, Player A positions themselves immediately for the second ball.
- Simultaneously, Player 2 passes the ball to Player B.
- Player B dribbles the ball around the circle and passes to Player A.
- Timing: Pay attention to when Player 2 starts.
- After the shot, Player A must switch immediately and position themselves.
- Player A should be passed to while in motion and indicate where they want the ball.
- Substitution: 1-A-2-B-1, etc.
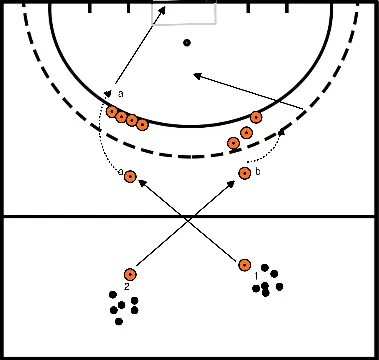
Execution
- Player 1 passes the ball to Player A.
- Player A receives the ball and dribbles around the cones.
- Player A finishes on the goal (backhand or forehand).
- After the shot, Player A positions themselves immediately for the second ball.
- Almost simultaneously, Player 2 passes the ball to Player B.
- Player B dribbles the ball around the circle and passes to Player A.
- Timing: Pay attention to when Player 2 starts.
- After the shot, Player A must switch immediately and position themselves.
- Player A should be played to in stride/movement and indicate where they want the ball.
Execution
- Red passes to white.
- Red runs towards the goal.
- Red receives the ball back from white in stride.
- Red plays the ball deep to blue, who has started running simultaneously.
- Red enters the circle and chooses a position; communication is essential here.
- Blue can choose to also run with the ball.
- Blue plays the ball to the position indicated by red.
- Red finishes.
- Communication between players.
- Ensure crisp passes.
- Pay attention to the timing of the passes and movements.
- Order: Red, White, Blue, Triangle Red, Red, ...
Execution
- The ball is played from the starting point with firm passes towards the goal.
- Player 5 passes to Player 6 in the circle and indicates whether they want it on the forehand or backhand.
- Player 6 sets the ball to the indicated side.
- Player 5 runs in and scores, preferably with a one-touch shot.
- After the action, the players rotate according to the scheme: 1 > 2 > 3 > 4 > 5 > 6 > 1.
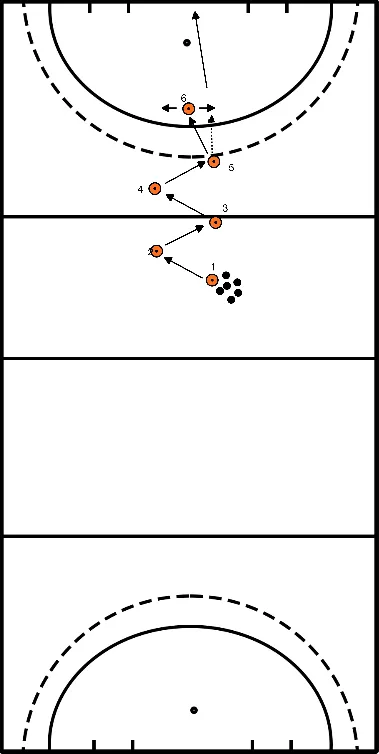
Execution
- Player A passes the ball to the incoming Player B.
- Player B passes the ball to the deep-moving Player C.
- Player D makes a forward run and receives the ball from Player C.
- Player D dribbles into the circle and passes towards the penalty spot to the incoming Player A.
- Player A rotates to the position of Player B.
- Player B rotates to the position of Player C.
- Player C rotates to the position of Player D.
- Player D rotates to the position of Player A.
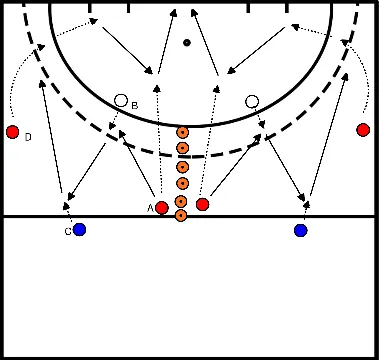
Execution
- White positions themselves in the square.
- Red passes the ball to White in the square.
- White tips or pushes the ball into one of the goals of their choice.
- White continues to the other side.
- Red then runs in and receives the ball from Blue.
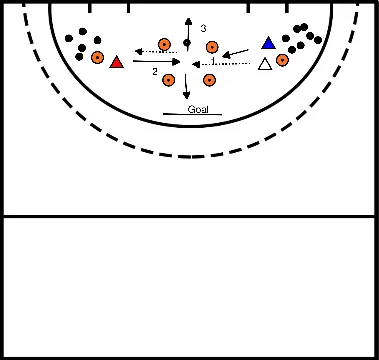
Execution
- Blue moves the ball around at a high tempo.
- After several passes, blue initiates an attack.
- Focus on playing around the outside, shifting the ball to the flank.
- Blue must move the ball quickly and accurately to surprise the opponent.
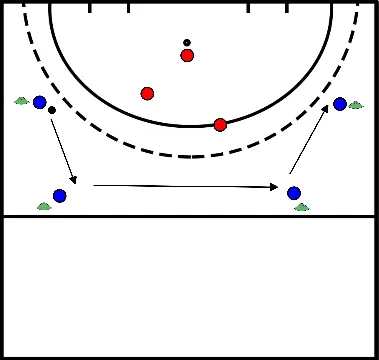
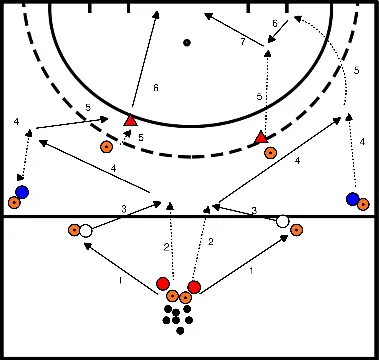
Execution
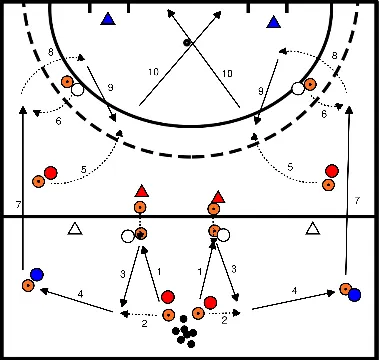
- The ball starts with red. White runs towards the ball. Red passes the ball to white and takes a few steps wide to the outside.
- White passes the ball back to red. Red passes the ball to blue.
- The second red (midfield player) moves inside while the second white (forward) moves outside.
- Blue passes deep along the line to the forward who has come to offer support there.
- The forward receives the ball and drives towards the goal.
- The midfield player comes in to guard the forward and receives the ball.
- The midfield player drives into the circle and shoots at the goal.
- Add two defenders (see red and white triangles).
- The red triangle applies pressure from behind on white and then takes the shortest route to the goal.
- The white triangle chooses whether to close off the line (pass 7) or to move inside with red.
- Blue must decide whether the pass can go along the line or needs to go inside.
- A 3 versus 2 situation arises with the two triangles against red (midfield player), white (pivot), and white (forward).
- If necessary, an additional defender can be placed at the edge of the circle.
- Optionally, an extra forward can be added from the other side (blue triangle).
- If the exercise can only be executed on one side at a time, an extra pass can be added before pass 1, for example, a cross-field pass from the other side of the playing field.
Description
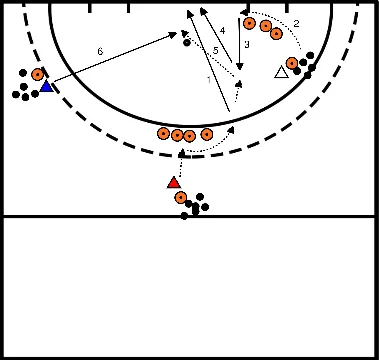
- Distribute balls over three cones: red, white, and blue.
- Red starts with a ball, dribbles towards the circle, and performs a passing movement at the cones on the edge of the circle.
- Red then shoots at the goal.
- At that moment, white dribbles with a ball towards the baseline and makes a loop around the cones.
- White looks for a pass (preferably perpendicular) towards red who has come forward after the shot.
- Red receives this pass and shoots at the goal (this can also be done directly without receiving).
- Red then continues towards a post or the penalty spot.
- Blue gives a hard pass to the spot where red is positioned.
- Red preferably tips this ball.
- Rotate in the sequence: red > white > blue.
- At least 3 forwards, 4 is also possible, and preferably with a goalkeeper.
- With 3 forwards: play with rebound.
- With 4 forwards: maximum 1 quick rebound and then rotate to avoid long waiting.
Execution
- The exercise is performed on both the left and right sides, allowing players to practice their skills in both directions.
- Three players are active in the exercise simultaneously, while the remaining players double up their positions.
- The exercise begins with a fast and accurate pass from the first player to the second player.
- The second player receives the ball and quickly handles it to pass it on to the third player.
- The third player completes the exercise by either passing the ball back to the first player with precision or choosing a new direction.