


Hockeyexercises for technique push pass
- Warm up through a combination of passing, running, and receiving on the move and from a standstill.
- The player at position A passes the ball straight to the player at position B.
- The player at position B passes the ball to the player at position C and runs towards point A.
- The player at position C receives the ball at point D and passes it to point A.
- For rotation, player A moves to B, B goes via D to C, and C moves to A.
- Variations in striking techniques can be applied (hit, push, slap).
- Distances can be adjusted to vary the difficulty level.
- Cones can be placed for passing in between to increase precision.
- Smaller cones increase the difficulty level.
- The ball from C to D can be rebounded.
- The ball from D to A can be rebounded.
- Point C can be placed on the other side for backhand and forehand variation.
- With a 90-degree setup of points B and C, the exercise can be performed from a different angle.
- Different scenarios can be set up to vary the exercise: standard, mirrored, 90-degree setup.
- As a trainer, observe the different techniques of the players.
- Stay low when receiving.
- When passing the ball from C to D, ensure the ball does not overshoot towards A.
- The player from B must receive the ball perpendicularly.
- Pass to the forehand whenever possible.
- Be ready to receive a ball (low to the ground, stick on the ground).
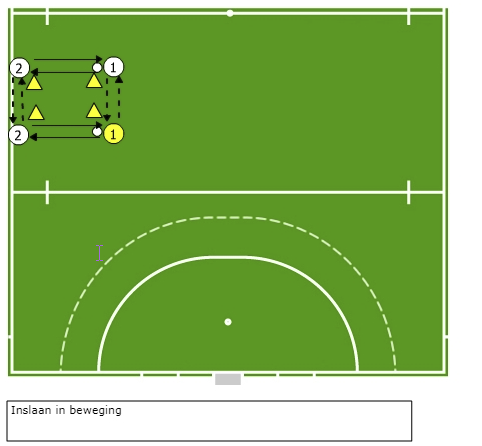
Purpose
: To get warm through a combination of passing, running, and picking up in the run and from standstill.
Format
:This exercise is also known from volleyball. The pawns are not exactly in a triangle. It is possible, depending on the number of players, to set up a multiple of the exercise.
- The player at A passes the ball straight to the player at B.
- The player at B plays the ball to the player at C and runs towards point A.
- The player at C receives the ball at point D and passes it to point A.
- For the changeover, A runs to B, B via D to C and C to A.

Variations:
- Variations can be made in terms of stroke. (hit, push, flats)
- The distances can be made larger or smaller to adjust the level of difficulty.
- Pawns can be placed to play in between. This is to increase the purity. When you make the cones smaller, the degree of difficulty increases.
- To play the ball from C to D there can be bounced.
- To play the ball from D to A you can play bounce.
- You can also place point C on the other side so that you reverse backhand and forehand.
- When you place point C at 90 degrees from point B, you can do the same exercise, only then you will hit point D from a different angle.
- When you set up different situations, you can rotate the exercise. Situation A is the standard, in situation B the exercise is mirrored, in situation C the exercise is set up so that point B and C are at 90 degrees from each other and situation D is a mirror of situation C.
Points of attention:
- As a trainer you can take a good look at the different techniques of your players.
- Sit low at the take-off.
- When playing the ball from C to D, the ball may not shoot too far in the direction of A. The intention is that the player coming from B should take the ball at right angles.
- Play the ball on the forehand where possible.
- Stand ready to receive the ball. (low to the ground, stick on the ground)
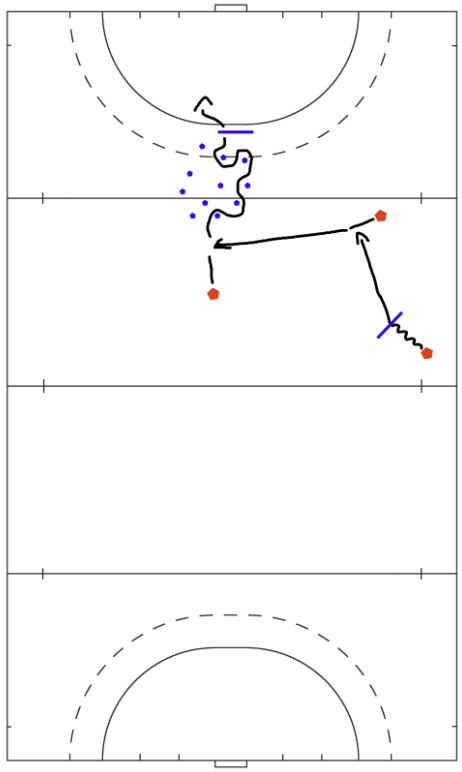
Purpose
:The purpose is to teach you how to make space for your teammates by claiming a defender to you.
Set-up:
- It looks like the player at point A is going to take the ball out, but instead of doing so he leaves the ball and runs to point C.
- At the moment that the player at A runs away, the player at point B takes over his position.
- The player with the defender at point C runs in as soon as he sees the player at point A leave the ball and run towards him.
- The ball is taken out towards point D.
- At point D the ball is taken out and played to point C. After playing the ball this player walks to point E.
- The player now at point C plays the ball to the player running to point E.

Variations:
- You can also mirror the exercise on the other side.
- When D can bounce the ball instead of taking it and playing it, the speed increases significantly.
- When C can also rebound, this increases the speed and effectiveness
- You can also give the C defender a more active role by having him try to get in front of his man.
Points of attention
- The smoother the exercise runs, the harder it is to defend it.
- Passes must be accurate for the exercise to be successful.
- Because there are many changes of position, it is important that you explain the exercise step by step.
Aim:
To become physically as well as technically warm as preparation for the training.
Set up:
The exercise will be done with a maximum of 4 people. Of course you can put a multiple of these so that the exercise still works.
1. The players 1 start with the ball and play it to their players 2. Then they change positions.
2. Players 2 play the ball back to players 1 and also change positions.
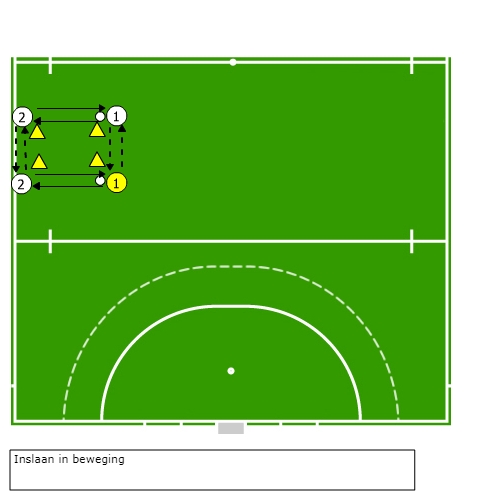
Variations:
- You can vary the way of passing (hitting, push, flats)
- Increase the distance between the pilons that players only has to run further.
- Increase the distance between the pilons that players have to pass over longer distances
- Increase both distances.
- Increase speed.
- Make as many successful passes as possible in time.
Points of attention:
- Sit low for a good control.
- Stick to the ground at ball control.
- Play the ball on the forehand side.
- Stand still while performing a ball control.
- Person 1 dribbles with the ball, does a 3D trick
- and passes a backhand to player 2 while running.
- Player 2 passes the ball to player 3 in the run.
- He dribbles along the obstacles and does a 3D trick at the end,
- Then player 3 hits the goal with a backhand shot.
Aim:
Getting warm through a combination of passing, running and controlling the ball while running or standing still.
Set up:
This exercise also known in volleyball. The pilons are not quite in a triangle. It is possible, depending on the number of players, to set up multiples of the exercise.
1. The player at A plays the ball straight on to the player at B.
2. The player at B plays the ball to the player at C and runs towards point A.
3. The player at C receives the ball at point D and passes it to point A.
4. For the substitution A goes to B, B via D to C and C to A.
Variations:
- The stroke can be varied. (hitting, push, flats)
- The distances can be increased or decreased to adjust the level of difficulty.
- Pilons can be placed to play in between. This to increase the accuracy. When you make the pilons smaller, the difficulty increases.
- To play the ball from C to D, it can be bounced.
- To play the ball from D to A, it can be bounced.
- You can also place point C on the other side so that you turn backhand and forehand.
- When you place point C in 90 degrees from point B, you can rotate the same exercise only then from a different angle at point D.
- When you put down different situations, you can let the exercise rotate. Situation A is the standard, with situation B the exercise is mirrored, with situation C the exercise is set up in such a way that point B and C are at 90 degrees from each other and situation D is a mirror of situation C.
Points of attention:
- As a trainer you can take a good look at the different techniques of your players.
- Sit low when controlling the ball
- When playing the ball from C to D, the ball must not pass too far in the direction of A. The aim is for the player coming from B to take the ball at right angles.
- Play where possible on the forehand.
- Stand ready to control the ball. (low to the ground, stick on the ground)
Aim:
- To become physically as well as technically warm as preparation for the training.
Design:
- The exercise will be done with a maximum of 4 people.
- Of course you can put a multiple of these so that the exercise still works.
- The players 1 start with the ball and play it to their players 2. Then they change positions.
- Players 2 play the ball back to players 1 and also change positions.
Variations:
- You can vary the way of passing (hitting, push, flats)
- Increase the distance between the pilons so that one only has to walk further.
- Increase the distance between the pilons so that one only has to move on.
- Increase both distances.
- Increase speed
- Make as many successful passes as possible in time.
Points of attention:
- Sit low for good control.
- Stick to the ground at ball control.
- Play ball on the forehand side.
- Stand still at ball acceptance.